


Pet parents all over the U.S. are making snack time fun with special treats. Using silicone molds, they make dog snacks shaped like paw prints and bones. These snacks bake well and come out of the molds easily. This guide is easy to follow, affordable, and safe. It helps you make homemade dog treats that look good and are safe to serve.
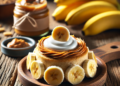
The best recipe is simple: pumpkin peanut butter dog treats. It needs pure pumpkin purée, natural peanut butter without xylitol, eggs, and oat or whole wheat flour. Roll the dough into small balls, then press it into the molds and bake at 350°F for 30 minutes. After baking, cool them on a rack for 10–15 minutes, invert to remove, and let them harden. Store them in a sealed container for up to two weeks at room temperature. You can also keep them in the fridge or freezer to last longer.
Silicone molds are perfect for no-bake treats too. You can make frosty pumpkin kefir bites, watermelon pupsicles, and peanut butter coconut oil chews. These DIY biscuits look great as gifts, are packed with nutrients, and are easy to make. Whether you’re trying a few or making a lot, you’ll get cute treats quickly.
This article helps with finding the right tools and safe ingredients, and shows how to make both baked and chilled treats. Whether for everyday rewards or holiday treats, making dog snacks at home is fun. You’ll find easy tips, ideas for the holidays, and shapes that dogs love. Making cute, healthy dog snacks at home is easy and caring.
Why Silicone Molds Make Dog Treats Extra-Cute and Easy
Silicone molds make turning simple batter into neat snacks easy. Each mold shapes the dough uniformly. This makes serving and giving them as gifts simple. You get professional-looking dog treats with little effort and mess.


Benefits of silicone molds for pet parents
The biggest advantage is the consistency. You press the dough into the tray. Then, as they bake, the treats puff up slightly and become even. This helps in controlling portions and keeping track of calories for dogs.
Another perk is fast clean-up and durable baking. Just place the tray on a baking sheet for stability. After baking, let it cool for 10-15 minutes. Then, flipping it over releases the treats easily. These molds are also great for chilled or no-bake recipes, making them versatile for different treat types.
Popular shapes: paw prints, dog bones, and seasonal designs
Paw print and dog bone molds make snacks fun and share-worthy. Dogs enjoy uniform treats. Humans appreciate their cute, tidy appearance.
For more creativity, try seasonal molds. Imagine pumpkins for autumn, hearts for Valentine’s Day, or stars for summertime. A single batch turns into something special, perfect for gifts, photos, and rewards.

When to choose molds vs. cookie cutters
Molds are great for quick baking, small sizes, and even cooking. They’re ideal for freezer treats and speedy oven batches. The design ensures treats are evenly thick from center to edge.
Cookie cutters are better for rolled out recipes or thicker treats. In choosing between cutters and molds, cutters are good for broad shapes and using up dough leftovers. Some bakers use both. First, they fill the tray with dough. Then, they use the rest to cut or cube for a no-waste process.
Essential Tools and Safe Ingredients for Homemade Dog Snacks
Making dog treats is easy and fun with the right setup. Get some good silicone baking tools and safe ingredients for dogs. You can make both baked and chilled snacks with these items.
Gear checklist: silicone dog treat molds, mixing bowl, spatula, baking sheet
Begin with silicone molds that make neat dog treat shapes. Place the molds on a tough baking sheet. This helps when you move them in and out of the oven. Then, use a big mixing bowl and a spatula for mixing heavy doughs.
You can use these tools for cold snacks too. The same molds are perfect for making frozen treats. The tray stops any spills in the freezer.
Dog-safe ingredients to prioritize: pure pumpkin purée, natural peanut butter without xylitol
Always use pure pumpkin purée, not the kind for pies. It’s smooth and good for your dog. Choose peanut butter without dangerous xylitol or bad additives. Eggs make the dough just right for the molds.
For cold treats, have some plain kefir or simple yogurt ready. Add some salmon or coconut oil for health. Use fruits like banana, blueberries, or watermelon for taste.
Flour options: oat flour for gluten-free or whole wheat flour
If you need gluten-free treats, go for oat flour. It makes treats soft. Whole wheat flour is good for a firm snack. Both work with the same simple recipe and cook nicely.
When you mix them, you’ll get a dough that’s easy to shape. Fill each mold bit by bit for perfect edges and designs.
Basic Baked Silicone Mold Treats: Pumpkin Peanut Butter Biscuits
These treats are a simple mix of pumpkin and peanut butter, needing just four ingredients. They fit perfectly in silicone molds for dog biscuits. Making them is straightforward, and you can choose oat flour for gluten-free snacks.
Simple 4-ingredient base: pumpkin, peanut butter, eggs, flour
First, mix 1/2 cup pure pumpkin purée, 3 tablespoons natural peanut butter, and 2 large eggs. Then, stir in 2 cups of flour. You can use oat flour for a gluten-free option or whole wheat for a traditional biscuit. Keep mixing until your dough is firm.
Dough tips: stiff texture, rolling into sub-1-inch balls, pressing gently into molds
Next, take small bits of dough and roll them into balls under 1 inch. Press each ball into the silicone mold but don’t overfill, as the dough expands a bit. If you have extra dough, flatten it and cut it into small pieces for baking.
Baking method: 30 minutes at 350°F, cooling and unmolding for crisp results
Place the molds on a baking sheet and bake at 350°F for 30 minutes. They should be dry and firm when done. After baking, cool them on a rack for 10–15 minutes, then pop them out of the molds. Letting them cool completely makes them crisp and tasty.
Storage guidance: room temperature up to two weeks; refrigerate or freeze for longer
Store these treats in an airtight container at room temp for up to two weeks. For keeping them longer, refrigerate or freeze them. Make sure to use a freezer-safe container and remove any extra air. Each biscuit has about 48 calories, providing some protein and fiber.
Chilled and No-Bake Ideas Using Silicone Trays
Silicone trays can turn simple mixes into neat, frozen dog treats. These treats are great for cooling down your dogs after walks. They’re quick to make and use wholesome ingredients.
Frosty pumpkin kefir bites for skin support
Mix pumpkin purée, plain kefir, and a bit of salmon oil together. Then, pour it into paw-shaped molds. These kefir treats firm up in the freezer and pop out easily. They’re gentle on the stomach and have a fun crunch.
Watermelon pupsicles with three ingredients
Blend seedless watermelon with a little water and some plain Greek yogurt. Use this mixture to fill bone-shaped molds. These bright pupsicles freeze quickly and taste like summer.
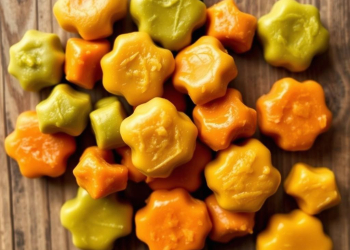
Peanut butter coconut oil chews in paw-print trays
Gently warm coconut oil and mix it with xylitol-free peanut butter and a dash of cinnamon. Pour into paw-shaped trays for shiny treats that become smooth. Store them in the fridge for easy use.
Frozen yogurt treats: ensure no artificial sweeteners
Mix plain yogurt with banana or pumpkin, but make sure there’s no xylitol on the label. Fill silicone molds with this mix for safe, creamy treats. Change up the flavors with the seasons and keep the sizes the same.
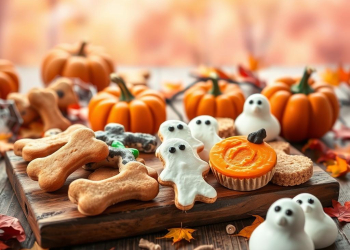
Fun-Shaped Treats
Shapes make snacks exciting and help us manage portions. Using silicone molds, we can create adorable dog treats. These include paw prints and bone shapes that not only look neat but also bake evenly.
After baking, let them rest on a cooling rack for 10–15 minutes. This makes it easy to pop them out of the molds.
For everyday rewards, paw-shaped treats are perfect. Use bone-shaped ones for training sessions. If there’s leftover dough, flatten it and cut into 1/2-inch cubes. This way, everything bakes evenly at 350°F for around 30 minutes. Keeping treats uniform lets you easily watch your pet’s calorie intake.
Special occasions call for seasonal dog biscuits. For Valentine’s Day, think heart shapes. For autumn, pumpkin shapes are ideal. Sources like Delish and Mom On Timeout inspire these creations. Packaged in a tin or jar with a ribbon, these treats make wonderful gifts for friends and their furry companions.
Pinterest shows a growing interest in gourmet and homemade frozen dog treats. Fun shapes make these treats more likely to be shared. Mix up the treats. Have paws for daily rewards, bones for training, and festive shapes for holidays. This way, your treats will always look good, be easy to transport, and remain consistent.
Flavor Variations and Seasonal Twists Your Dog Will Love
Change flavors to match your dog’s mood and the season. Then, press the batter into paw or bone molds. This makes the treats look cute and keeps portions small. Always choose dog-safe ingredients to ensure gentle digestion and appealing colors.
Fruit-based treats can be fun to make. The Cookie Rookie suggests oat-and-apple pretzels that can inspire apple oat treats for dogs. Use mini molds for them. BellyFull has a loaf recipe that’s great for making banana zucchini dog treats. They come out moist and mild. Southern Bytes shows that blueberry treats go well with oats and a bit of peanut butter for a nice, balanced chew.
If you prefer savory treats, there are easy options that are healthy too. Three Little Ferns highlights how chicken beet dog treats pack in vitamins and minerals like vitamin C and potassium. Using bone molds not only looks great but also makes the treats uniform. This is perfect for using them as training rewards.
For a special treat, try adding peanut butter and bacon. Both Pinch of Yum and Sally’s Baking Addiction have recipes for bacon-flavored treats with peanut butter. They suggest baking them in small silicone molds. That way, they cool off quickly and are easy to store.
When fall comes, it’s time for warm bakes and cool treats. Delish and Mom On Timeout share recipes for pumpkin dog treats. They’re made with smooth pumpkin purée and a hint of cinnamon. Sunny Day Family offers a no-bake treat that’s easy to make. Just freeze them for a bit, and they’re ready to enjoy during fall activities.

Baking, Unmolding, and Storage Best Practices
Small changes can make your dog treats perfect. These tips help you get treats that look and taste great. They focus on getting the right shape, easy removal from molds, and keeping them safe to eat.
Don’t overfill: molds puff slightly during baking
Start with dough balls smaller than 1 inch. Fit them just right into silicone molds. Place the molds on a baking sheet. Bake at 350°F for around 30 minutes. They should be dry and firm at the edges. This helps keep your treats looking sharp without overflowing.
Use a cooling rack and invert after 10–15 minutes
After baking, move the molds to a cooling rack. Wait for 10–15 minutes before flipping them over. Unmolding treats this way reduces breakage. Allow them to cool completely on the rack. They get crunchier as they cool down.
Batching strategy: molds first, then cut remaining dough into cubes
When making lots of treats, fill up all your molds first. If there’s dough left, flatten it to between 1/3 and 1/2 inch. Cut it into 1/2-inch cubes. Bake these cubes for 30–35 minutes. This way, all your treats will be ready at the same time and have the same texture.
Shelf life, freezing tips, and airtight storage
Make sure treats are cool before packing them. Store them in airtight containers at room temperature. They’ll stay fresh for one to two weeks. To keep them longer, freeze them. Use freezer bags and push out any air to avoid freezer burn. For treats with yogurt, make sure they don’t have artificial sweeteners. Keep these treats frozen until it’s time to eat them.
Remember these important steps: don’t overfill, bake until dry, flip for a clean release, and store properly. These steady habits will make your dog treat baking a success. Every batch will come out just right, and your dogs will love them.
Conclusion
Making treats at home is fun and easy with silicone molds. You get snacks that look great and are healthy for your dog. This guide helps you make treats that are safe and tasty.
The basic recipe uses pumpkin, peanut butter, eggs, and flour. Just press the mix into molds and bake. You can keep them fresh for weeks. These steps make sure your pet treats stay good to eat and easy to use.
There are cool ideas for cold treats too, like kefir and Watermelon Pupsicles. Add in seasonal ingredients for variety. These recipes keep things simple but interesting.
Start with some favorite molds and keep your kitchen ready. This guide shows making treats can be a regular thing. They’re healthy, cute, and perfect for any pet owner wanting to give their dog something special.


Discussion about this post