


Good nutrition is key to a dog’s health, energy, and happiness. Vet-Approved Homemade Dog Meals let owners pick the ingredients and how to cook them. This means less filler, better digestion, and plans for dogs with allergies or sensitive stomachs. This guide gives recipes for make-ahead dog meals, backed by vets, that are both safe and smart.
Every recipe provides full, balanced nutrition. It keeps calcium and phosphorus balanced and includes important omega-3s. Remember to safely prepare foods: cook ground beef to 160°F, steak to 145°F, and poultry to 165°F. Keep meals in the fridge for 3–5 days or freeze for up to two months. When reheating, use hot water or a double boiler for even heating.
There are seven recipe types. They range from a chicken and brown rice mix inspired by Rocky Kanaka and vet-approved to a turkey-and-veggie dish with calcium citrate from The Spruce Pets. You’ll find a grain-free stew, a DHA-rich meal for puppies, a chicken and bone broth topper for large breeds, a varied “puploaf”, and an easy Instant Pot recipe. All these recipes fit real-life kitchens and schedules.
We talk about safe extras like fish oil and calcium carbonate, and what not to add, like extra vitamin C. Taurine is important and comes from meat and fish, but some dogs might need more. Get tips for making dog food in batches, portioning, and changing from kibble to homemade gradually. For those wanting to make healthy dog food that fits a busy life, freezing and serving it is a smart choice.
Whether you cook weekly or monthly, it’s easy: prepare once, portion correctly, and serve confidently. Next, we’ll show how planning ahead can help your budget, daily life, and your dog’s happiness—no guessing needed.


Why Prep-and-Freeze Dog Meals Are Smart for Health, Budget, and Convenience
Prepping meals ahead saves time during busy weeks. It ensures each meal is balanced, fresh, and ready to serve. This method reduces stress and helps maintain routines, especially on rushed mornings.
https://www.youtube.com/watch?v=GIn949W97_Y
Benefits vs. risks of homemade dog food
Homemade dog food lets owners use whole ingredients and avoid preservatives. It’s great for dogs with allergies or picky appetites. Dogs often digest these meals better and find them tastier.
But, homemade diets can miss essential nutrients. Low omega-3s can affect the coat’s shine, and too much liver can raise vitamin A too high. Imbalanced minerals can harm bones and teeth. Supplements must be added carefully, and avoid human foods with xylitol.

Smart planning makes homemade meals affordable without sacrificing quality. Choosing ingredients like turkey and in-season produce saves money. For dogs with pancreatitis, use lean meat. Rotating proteins helps dogs with allergies feel better.
How batch cooking supports consistent, balanced nutrition
Batch cooking ensures every meal is consistent and balanced. Freeze portions for up to two months. Thaw gently to keep the nutrients intact.
Keeping the right balance of grains, proteins, and veggies is easier with structured prep. Add calcium when cooking, and fish oil right before serving to keep omega-3s fresh. Uniform portions are simple with the right tools.
Always cook meats to the proper temperature before freezing. Labeling everything reduces waste and surprises. This habit makes sure each meal fits your dietary plan.
When to involve your veterinarian or a veterinary nutritionist
Always consult your vet before changing your dog’s diet. They can advise on the right food amounts, supplements, and ingredients for allergies. This is especially true if your dog has had urinary stones.
Switching foods requires monitoring for any health changes. Take a recent food log and your recipes to vet appointments. A specialist can adjust the diet as needed and catch any nutrition gaps early.
With planned prep, batch cooking, and regular vet check-ins, homemade meals remain doable and safe. Thoughtful preparation ensures the health, reliability, and affordability of your dog’s diet.
Essential Nutrients and Safe Add‑Ins for Balanced Homemade Diets
A balanced homemade dog diet needs real food and clear goals. It aims to cover energy needs, protect organs, and boost skin and coat health. These essentials help owners maintain consistency in every meal they prepare.
Key nutrients dogs need: protein, fats, carbs, calcium, phosphorus, omega-3s, vitamins, minerals, fiber
Protein helps with tissue repair and the immune system. Sources include chicken, beef, turkey, eggs, and fish. Fats are key for energy and helping with the absorption of vitamins.
Carbs like rice and oats are important to keep protein for building muscles.
Calcium is needed for bone health and should match up with phosphorus. Omega-3s support the brain and joints. Dogs also need vitamins A, D, E, B-complex, zinc, and iodine. Fiber helps their digestion.
Safe, vet‑recommended additions: fish oil, eggshell/calcium carbonate, kelp, zinc, vitamin E, pumpkin, blueberries, bone broth
Safe supplements are important for filling dietary gaps. For example, dogs might get about 1000 mg of fish oil per 30 pounds daily. Remember to choose oils made for pets and without any added flavors. Also, include a bit of vitamin E to balance out the fish oil.
To hit calcium needs, use ground eggshell or calcium carbonate if you’re not including bones in meals. Add a bit of kelp powder for iodine, and chelated zinc for healthy skin and coat. For an extra health kick, throw in some pumpkin, blueberries, or carrots, and a little unsalted bone broth (without onion or garlic).
Stay away from human products with xylitol or added sweeteners. When adding supplements, measure based on the total recipe to keep the diet balanced from one batch to the next.
Why dogs don’t need supplemental vitamin C, and taurine considerations
Dogs naturally produce vitamin C, so they usually don’t need extra. Too much could lead to stomach upset. Focus more on varied protein sources and steady vitamins and minerals.
Taurine is especially crucial for some dogs, like older ones or those with little meat in their diets. Meat and fish are great natural taurine sources. Keep animal protein at the heart of their diet, and talk with your vet about specific needs related to heart health or diet.
Food Safety, Toxic Ingredients to Avoid, and Freezer Storage Best Practices
Start by cleaning your hands, counters, and bowls to make dog food safer. Keep raw meats away from veggies. Use different cutting boards for them. Always use a thermometer to check if dog food has reached safe temps: ground beef at 160°F, steak at 145°F, and poultry at 165°F.
When reheating dog food, add a bit of hot water and mix. Or, you can gently heat it using a double boiler. Avoid microwaves because they can cause uneven heating. Heat it in short periods and stir well. Always test the temperature on your wrist before feeding.
Keep certain foods away from dogs because they can be toxic. Avoid onions, garlic, grapes, raisins, and chocolate in the kitchen. Be careful with products containing xylitol, a sweetener very harmful to dogs, even in small amounts. Also, don’t give dogs cooked bones as they can splinter and damage their intestines.
Add unsweetened cranberries without extra stuff when using dried fruits. Add delicate things like flax oil or vitamin E right before serving. It keeps the food safe, tasty, and full of nutrients.
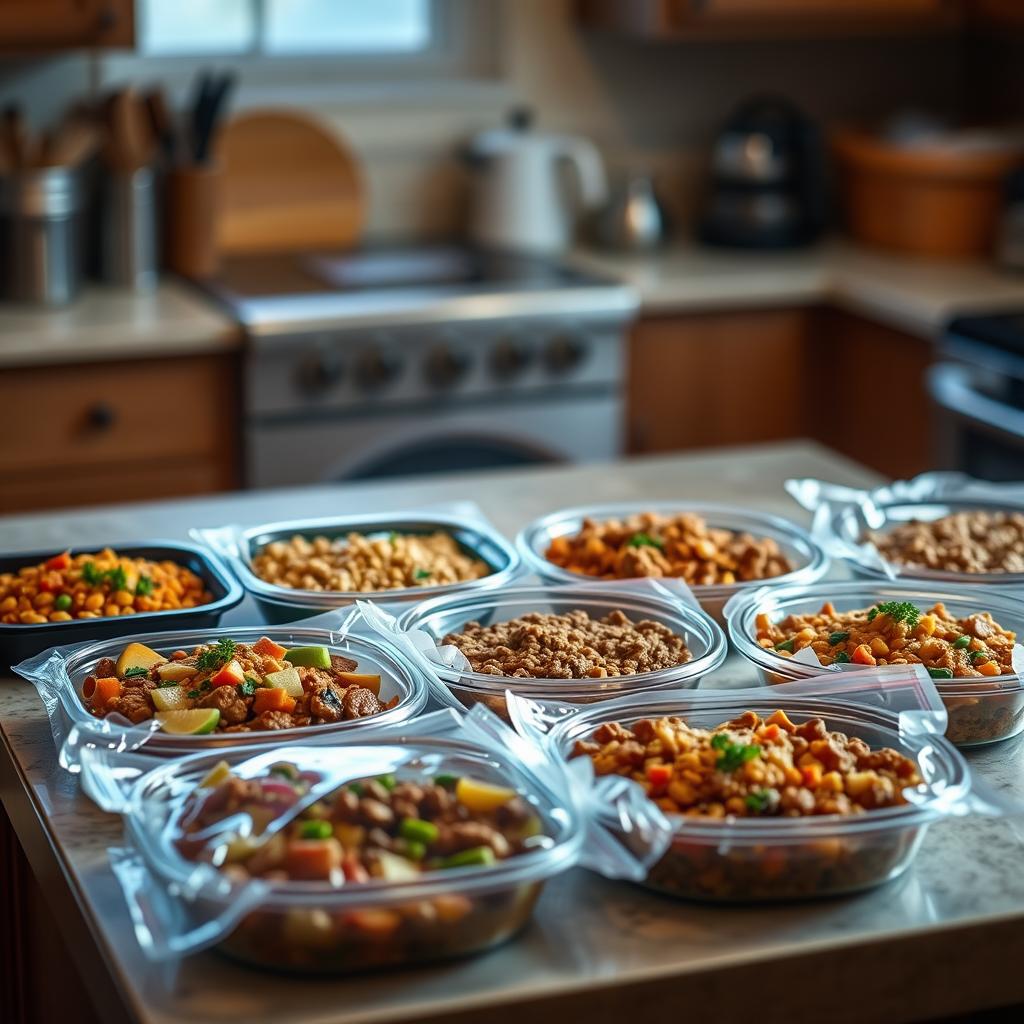
For freezing dog meals, use meal-sized packs for easy use. You can keep cooked food in the fridge for 3–5 days or freeze it for up to 2 months. Use Souper Cubes for easy thawing. Always label them with the recipe name and date.
Batch cooking is great for busy families. Using an Instant Pot, you can make enough food for a large dog for nine days. For a small dog, it can last almost a month. Layer everything properly to cook it right. Add any extra toppings after cooking.

Thaw meals in the fridge overnight or under cool water. Warm them up gently and mix for even heat. Remember, keeping dog food safe while reheating is crucial. Also, check the food temperature during prep days. This ensures the food stays good quality and keeps you worry-free.
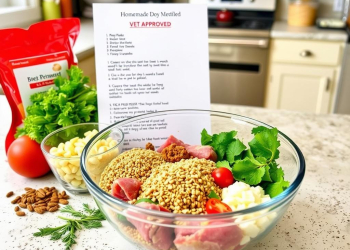
Vet-Approved Homemade Dog Meals
These meals mix real ingredients with veterinarian advice. They freeze well and are good for dogs with different needs. You’ll find ideas similar to Rocky Kanaka’s and other veterinarians who like simple foods.

Chicken and brown rice power mix (Rocky Kanaka–inspired, vet-collab)
This recipe includes whole chicken, brown rice, and healthy extras. Add blueberries and carrots, then cool it down. Lastly, mix in coconut oil and other healthy spices.
Make patties for freezing. For a 30-pound dog, serve one cup per meal. Adjust based on the dog’s size and energy.
Turkey and veggie bowl with calcium citrate for bone health
This 20-pound dog recipe has turkey, veggies, and seeds. It’s balanced with coconut and salmon oil, and 500 mg of calcium citrate.
Dogs with urinary stones should see a vet first. Freeze in portions for easy serving.
Grain‑free sensitive‑stomach stew with pumpkin and flax oil
This stew is made for easy digestion. It has turkey, pumpkin, peas, and sweet potatoes with flax oil.
The fiber and flax oil support digestion and health. Cool fully before freezing.
Puppy DHA‑boosted meal with tuna and quinoa
This puppy recipe has tuna, quinoa, and vegetables with coconut oil. DHA is included for brain and eye health.
Divide it into small meals. Rotate with other foods to provide various nutrients.
Large‑breed joint‑friendly chicken and bone broth topper
Add chicken and low-sodium bone broth to regular meals. Include broccoli, rice, and blueberries for extra health benefits.
Warm it slightly to keep the nutrients. It’s good for hydration and joint health.
High‑variety “puploaf” bake with organ meats, sardines, greens, and cranberries
This loaf has beef, chicken hearts, organs, and sardines. It includes vegetables, eggs, and cranberries too.
Mix well, bake, then cool. Refrigerate for up to five days. Freeze the extra, and add flax oil when serving.
Instant Pot batch recipe for set‑and‑forget weekly meal prep
For Instant Pot meals, start with olive oil and veggies. Add quinoa or rice, then meat like turkey or beef.
Cook for 35 minutes. Add coconut oil, calcium, or turmeric as needed. Freeze in bags for easy use.
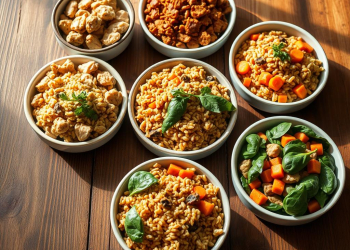
Portioning, Freezing, and Reheating: Make‑Ahead Methods That Preserve Nutrition
Smart prep saves flavor, texture, and nutrition. You can portion dog meals by weight and activity. This way, each block is just right when served. Many pet parents use a rule of thumb: a 30‑pound dog usually eats about 1 cup per meal. Adjust the amount based on your vet’s advice.

Souper Cubes make prep days easy. After the food cools, fill the trays, level them, and label with date and recipe. Freeze portions as single meals or patties. This reduces waste and ensures consistency every week.
How to portion by meal size; Souper Cubes and freezer‑safe containers
For medium dogs, use 1‑cup wells, and smaller ones for toy breeds. Use 2‑cup wells for large dogs. For Rocky Kanaka–style mixes, shape patties to a single‑meal size. This makes it easy to grab, thaw, and serve. Keep extras in freezer‑safe containers. Remember to add oils like flax or fish oil when serving.
Refrigeration and freezing timelines; gentle reheating vs. microwave
Keep cooked meals in the fridge for 3–5 days. You can freeze portions for up to 2 months. To warm them up, pour in hot water and mix, or gently reheat using a double boiler. This keeps the heating even and safe. If using a microwave, heat in short bursts and stir well to prevent hot spots.
Cook temps for meats: ground beef, steak, poultry
To ensure safety, check meat temperatures with a thermometer. Ground beef must hit 160°F (71°C). Steaks need to be at least 145°F (63°C). Poultry should be cooked to 165°F (74°C). Let it cool before packing to avoid condensation during storage.
Transitioning From Kibble and Spotting Deficiencies Early
Plan a slow diet change for your dog. Start by mixing 10% homemade food with 90% of their current food over 7–10 days. Gradually increase the homemade portion daily. Keep an eye on their stool, how hungry they seem, and their energy levels.
Talk to your vet or a pet nutrition expert first. They can help you choose the right food amounts and types. This is especially true for dogs with special health needs like pancreatitis or allergies.
Keep a simple diary to track your dog’s food and how they react to it. Note down ingredients, when you made the food, how much they eat, and their daily health signs. Share this diary with your vet to make sure the diet is working well.
Be on the lookout for signs that your dog isn’t getting the right nutrients. These signs can be a rough coat, stool issues, tiredness, or losing weight without trying. If you notice these, stop the diet change and talk to your vet.
If you notice loose stools, don’t change the diet further for a bit. Your dog skips a meal? Cut back on the homemade food portion before trying again. Once everything looks good for 48 hours, you can continue adjusting their diet slowly.
For active dogs and young puppies, it’s important to watch their weight closely. Even if they love the taste of their food, it’s easy to overfeed them. So, check their weight regularly. Make sure they’re getting enough protein, calcium, and essential fats.

Switching to homemade food means keeping meal times and water availability consistent. Introduce new proteins one by one. Also, adjust their calorie intake based on how active they are to keep their energy levels stable and avoid sudden weight changes.
Notice small changes in your dog’s health, like a shiny coat, normal poop, clear eyes, and a stable weight. If anything seems wrong, go back to the last food mix that worked well. Ask for advice and keep a close eye on your dog’s diet and health.
Serving Guides by Size and Life Stage for Prepped Meals
Portions differ as dogs grow, age, and their activity levels change. Start with the dog feeding amounts by weight. Then, adjust based on a puppy feeding guide or your vet’s advice. Divide the daily total into two or three meals for constant energy.
General daily feeding ranges for puppies, adults, and seniors
For puppies: If they’re under 10 lbs, they need ¾–1 cup; for those 10–25 lbs, it’s 1–2 cups; 25–50 lbs requires 2–3½ cups; 50–75 lbs should get 3½–5 cups; and if they’re over 75 lbs, they’ll need 5–6½ cups. Use a puppy feeding guide and check their weight regularly.
For adults: Less than 10 lbs need ½–¾ cup; 10–25 lbs require ¾–1½ cups; 25–50 lbs should have 1½–2½ cups; 50–75 lbs need 2½–3½ cups; over 75 lbs requires 3½–4½ cups. Match the amount to their weight and check their body condition weekly.
Seniors: If they’re under 10 lbs, give them ½–⅔ cup; for 10–25 lbs, it’s ¾–1¼ cups; 25–50 lbs need 1½–2¼ cups; 50–75 lbs require 2¼–3 cups; over 75 lbs should have 3–4 cups. Focus on keeping muscle without adding fat.
Adjustments for activity level, pregnancy/lactation, and health conditions
Active dogs or those that work a lot need more food. Increase their calories gradually. Look at their ribs and waist to judge. Cut back on food during less active days to avoid gaining weight.
Pregnant or nursing dogs need extra energy and water. Feed them calorie-rich but balanced meals, divided into three or four portions. Ensure they get enough calcium and phosphorus. Consider eggshell or calcium carbonate with boneless meats.
If your dog has urinary issues like struvite or calcium oxalate stones, check with your vet before adding supplements like calcium citrate. Cooking with methods like an Instant Pot helps. It keeps meals consistent in moisture and portion size.
Allergy and pancreatitis considerations; novelty proteins and lower‑fat choices
For allergies that cause itchy skin or GI problems, try new types of meat like bison, venison, or elk. Introduce one at a time and monitor their reaction. Include fish oil for omega-3s and check that cranberries are unsweetened in mixes.
For pancreatitis, choose lean meats like ground turkey, white fish, or chicken breast without skin. Stay away from dark meat and lots of fat. Skim the broth before using. Stick to low-fat recipes and adjust the calories as your dog gets better.
The aim through all life stages is to maintain steady energy, a glossy coat, and a visible waistline. Base their diet on the right amount of food for their weight, a good feeding guide, and proper portions for seniors. Then, make slight changes for activity level, allergies, and issues like pancreatitis to ensure their meals are both safe and enjoyable.
Conclusion
To start with homemade dog food, pick recipes your vet approves. Cook them safely and freeze in portions that last two months. This method keeps food fresh, reduces waste, and ensures your dog gets the right nutrition.
Introduce the new diet slowly over 7 to 10 days to aid digestion. Regular vet visits will keep the nutrition balanced and catch any health issues early.
Add useful ingredients to boost health. Include fish oil, eggshell or calcium carbonate, kelp, zinc, vitamin E, pumpkin, and blueberries. Even though dogs produce vitamin C, they need taurine from meat or fish. Cooking in bulk is easier with an Instant Pot or slow cooker. Consider making a puploaf to freeze for later use.
Use tools like Souper Cubes for easy freezing. Keep extras in the fridge for up to five days to stay organized. Add flax oil right before serving to keep it fresh. Combine homemade food with high-quality kibble or get meats from reliable sources to save time but still be in charge.
Remember, every dog has different needs based on their age, size, and health. Choose proteins and fats carefully. Use lean or unique proteins for dogs with health issues. Always make sure to include calcium in recipes without bones. Safe food handling, proper storage, and following expert advice can make homemade dog food a great choice. It turns fresh ingredients into meals that are healthy, satisfying, and ready whenever your dog is.


Discussion about this post